The following is a tutorial on how to install and configure a DNS server:

MY SERVER SPECS:
root@ubuntu-DNSSVR:/home/tokunbo# lsb_release -a
No LSB modules are available.
Distributor ID: Ubuntu
Description: Ubuntu 16.04.2 LTS
Release: 16.04
Codename: xenial
In my setup, my server-IP is the same as my DNS-server IP:
auto enp0s3
iface enp0s3 inet static
address 172.16.1.20
netmask 255.255.255.0
gateway 172.16.1.1
First is to configure my server for internet access, however using a public DNS like 8.8.8.8. After DNS server is configured and tested ok, I'll change the DNS-server IP(on the DNS server) to its own server-IP.
1) UPDATE / UPGRADE DNS SERVER SYSTEM SOFTWARE if required:
sudo apt-get update
sudo apt-get upgrade
sudo apt-get dist-upgrade
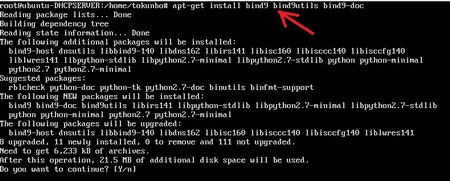
2) INSTALL BIND9
sudo apt-get install bind9 bind9utils bind9-doc
3) CONFIGURE CACHING
A caching name server saves DNS query results locally for a short time, thus helps to reduce the traffic on the server. In general server performance improves.
To configure Caching, we need to edit file: /etc/bind/named.conf.options
Uncomment these lines:
// forwarders {
// 0.0.0.0;
// };
Edit as follows:
forwarders {
8.8.8.8;
};
4) RESTART BIND9 SERVICE
sudo systemctl restart bind9
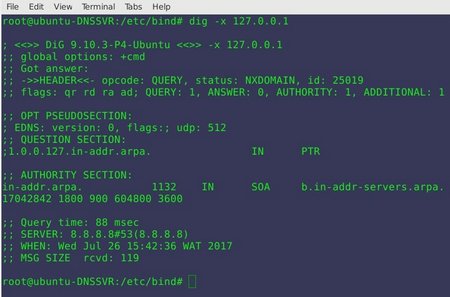
5) CHECK CACHING STATUS
Lets check if Caching is working or not:
command: dig -x 127.0.0.1
if you see an output like the below, it means caching is ok on the server:
root@ubuntu-DNSSVR:/etc/bind# dig -x 127.0.0.1
; <<>> DiG 9.10.3-P4-Ubuntu <<>> -x 127.0.0.1
;; global options: +cmd
;; Got answer:
;; ->>HEADER<<- opcode: QUERY, status: NXDOMAIN, id: 25019
;; flags: qr rd ra ad; QUERY: 1, ANSWER: 0, AUTHORITY: 1, ADDITIONAL: 1
;; OPT PSEUDOSECTION:
; EDNS: version: 0, flags:; udp: 512
;; QUESTION SECTION:
;1.0.0.127.in-addr.arpa. IN PTR
;; AUTHORITY SECTION:
in-addr.arpa.1132 IN SOA b.in-addr-servers.arpa. nstld.iana.org. 2017042842 1800 900 604800 3600
;; Query time: 88 msec
;; SERVER: 8.8.8.8#53(8.8.8.8)
;; WHEN: Wed Jul 26 15:42:36 WAT 2017
;; MSG SIZE rcvd: 119
root@ubuntu-DNSSVR:/etc/bind#
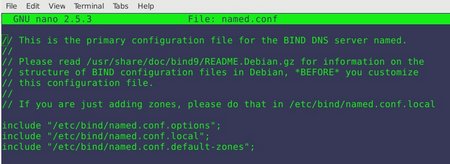
6) EDIT BIND9 CONFIGURATION FILE
Bind9 configuration files are available in /etc/bind9 directory. We need to edit this file: /etc/bind/named.conf
By default, the file should have the lines below uncommented:
include "/etc/bind/named.conf.options";
include "/etc/bind/named.conf.local";
include "/etc/bind/named.conf.default-zones";
save any changes you made to file: /etc/bind/named.conf
7) SET PROPER PERMISSIONS TO BIND9 DIRECTORY
The ideal permission and ownership for bind9 directory should be as follows:
sudo chmod -R 755 /etc/bind
sudo chown -R bind:bind /etc/bind
8) CHECK DNS CONFIG FILES - if there are any issues
command: sudo named-checkconf /etc/bind/named.conf
if all is well, there shouldnt be any output - meaning configuration is ok.
9) CONFIGURE DNS-SERVER IP ON SERVER
In my case, since the DNS server-IP is the same IP-address as the server itself, I editted my /etc/network/interfaces file and changed DNS server IP as follows:
dns-nameservers (my-dns-server-ip)
for example:
auto enp0s3
iface enp0s3 inet static
address 172.16.1.20
netmask 255.255.255.0
gateway 172.16.1.1
dns-nameservers 172.16.1.20
10) FINALLY RESTART BIND9 SERVICE
sudo systemctl restart bind9
---------------------------------------
TESTING TIME
On the server itself, if you check nslookup at terminal,
root@ubuntu-DNSSVR:/etc/network# systemctl restart bind9
root@ubuntu-DNSSVR:/etc/network# nslookup
> www.yahoo.com
Server: 172.16.1.20
Address: 172.16.1.20#53
Non-authoritative answer:
www.yahoo.com canonical name = atsv2-fp.wg1.b.yahoo.com.
Name: atsv2-fp.wg1.b.yahoo.com
Address: 46.228.47.115
> nairabytes.net
Server: 172.16.1.20
Address: 172.16.1.20#53
Non-authoritative answer:
Name: nairabytes.net
Address: 208.91.198.54
> cisco.com
Server: 172.16.1.20
Address: 172.16.1.20#53
Non-authoritative answer:
Name: cisco.com
Address: 72.163.4.161
Test from a client computer and set the DNS server accordingly.
Your comments and questions are welcome.!!!