In this tutorial, we will add a new Widget Area to our child-theme.
Step-1: create a functions.php file inside our child-theme: twentyten-child
Open / edit your child-theme and add the following:
function twentyten_child_init()
{
// comments: these are my own new functions
// Area 7, located at the top of the sidebar.
register_sidebar( array(
'name' => __( 'Nairabytes Widget Area-1', 'twentyten-child' ),
'id' => 'nairabytes-widget-area-1',
'description' => __( 'NairaBytes widget area.', 'twentyten-child' ),
'before_widget' => '<li id="%1$s" class="widget-container %2$s">',
'after_widget' => '</li>',
'before_title' => '<h3 class="widget-title">',
'after_title' => '</h3>',
) );
}
/** Register sidebars by running twentyten_widgets_init() on the widgets_init hook. */
add_action( 'widgets_init', 'twentyten_child_init' );
explanation: the following are the most important details in the above code
- Nairabytes Widget Area-1 = name of the widget area
- NairaBytes widget area = description of the widget area
- twentyten-child = child theme name
don't forget the function start and ending declarations.
Step-2: copy file: sidebar.php from parent theme into child-theme
Open our sidebar.php file(inside the child-theme), scroll down to the end of the file and add the following code:
<?php
// Nairabytes widget area
if ( is_active_sidebar( 'nairabytes-widget-area-1' ) ) : ?>
<div id="secondary" class="widget-area" role="complementary">
<ul class="xoxo">
<?php dynamic_sidebar( 'nairabytes-widget-area-1' ); ?>
</ul>
</div><!-- #secondary .widget-area -->
<?php endif; ?>
What we are doing here is to call our widget inside the sidebar. 'nairabytes-widget-area-1' - is the id we declared in step-1 above.
Checking our child-theme, Appearance >> Widgets
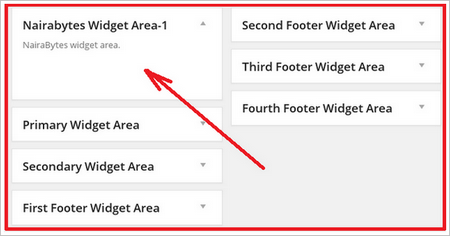
Place any widget into this new position, save, refresh and check your front-page now.
So now, we can create new widget areas inside the sidebar.php itself as well as inside other theme files: header.php, footer.php, or new page-template files.
Happy Wordpressing!!